The following comprises instructions for the SQL Statements plug-in, as well as an example use case to provide more detailed step-by-step instructions.
Contents
1. Introduction to the plug-in
1.3 Position in the Overall Software Package
3. How to Create SQL Statements
3.1 Multiple data sources from different data bases
3.2 Data source specific syntax
5. How to Export SQL Statements
1. Introduction to the plug-in
The SQL Statements plug-in enables you to create individual SQL Statements for your database queries. These can be used in all plug-ins in which data is to be worked with to specify the relevant data pool as desired.
You can use the SQL Statements plug-in to create your own SQL Statements. This means that you can individually specify the data you want to add to a plug-in – once created, SQL statements can be used in all plug-ins.
So that you have the right SQL Statements for every application, you can create as many as you like and assign these any name, enabling you to maintain an overview at all times.
In addition, when you create an SQL Statement, SimAssist immediately checks that this has been created with the correct SQL syntax and whether data is returned accordingly when it is used.
1.3. Position in the Overall Software Package
The SQL Statements plug-in is part of the 2check module, which also contains the Variables and Checking plug-ins. SQL Statements is available when you license the 2check module for SimAssist.
1.3.2. Links to Other plug-ins
As the SQL Statements plug-in is responsible for specifying database queries, it is linked to all plug-ins that may also be involved in the data query process. This includes all plug-ins to which data can be added.
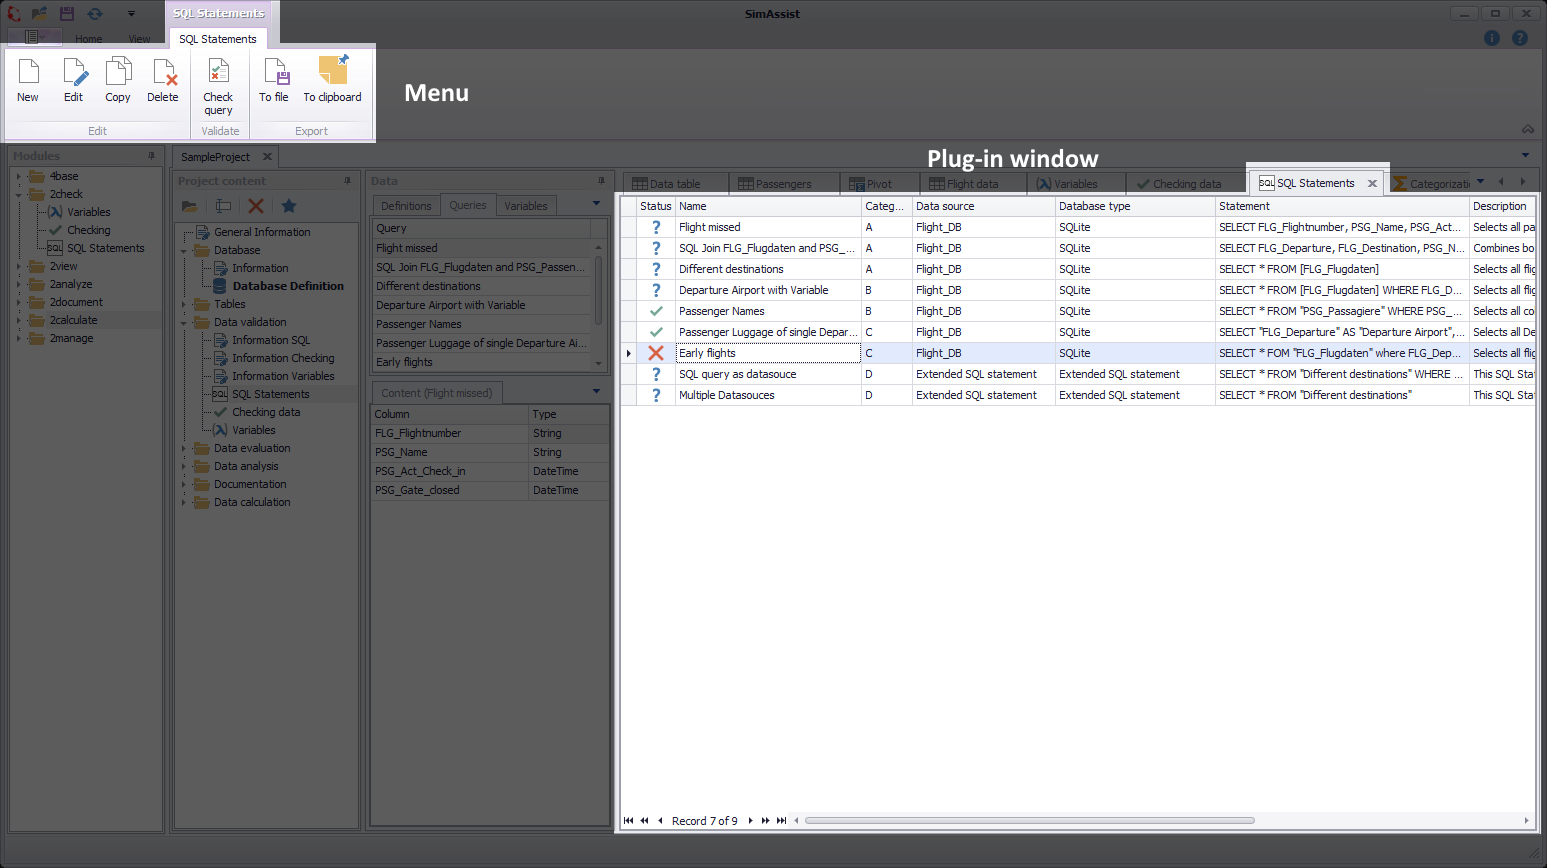
Figure 1 - Layout of the SQL Statements plug-in
In the upper part of the plug-in the menu containing the interactions New, Edit, Copy, Delete, Check query, To file and To clipboard is positioned.
Directly below it, adjacent to it, is the display of SQL queries that have already been created. The icons of the Status column are explained below:
Button |
Description |
|
The query was checked and the syntax is valid |
|
The query was checked and the syntax is not valid |
|
The query was not checked yet |


The SQL Statements plug-in menu contains the functions required to create and manage SQL Statements that can be used for querying data across all plug-ins.
The menu’s individual interaction options are presented below.
Button |
Description |
|
Opens the dialog box for creating a new SQL statement. |
|
Opens the dialog box for editing the SQL Statement currently selected. |
|
Copies the SQL Statement currently selected and allows you to assign the copy a name. |
|
Deletes the SQL Statement currently selected (warning: you are not asked to confirm this). |
|
Checks the created SQL Statement for correct syntax. |
|
Exports the SQL Statement(s) selected to a txt file. |
|
Exports the SQL Statement(s) selected to the clipboard. |


3. How to Create SQL Statements
|
Attention Because of technical reasons it is not possible to use a single pipe char "|" within SQL statements. But it is possible to use the "||" operator without any problems. |

|
Information Comments in SQL Statements plug-in Comments can be inserted anywhere in the SQL statement with "--" |

To create SQL statements, please choose New in the plug-in menu – the appropriate dialog box opens (see Figure 2).
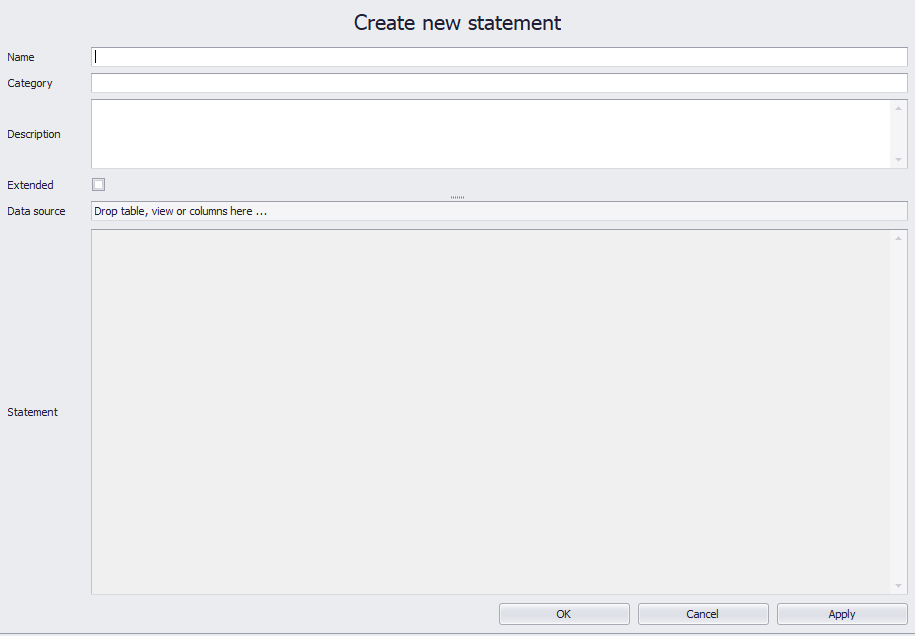
Figure 2 - Dialog box for adding a new SQL statement
First, you need to assign a unique name, to which you can add a description to make it easier to identify the SQL Statements created.
The Category field can be used as an additional option for sorting the created SQL queries.
To now create the actual SQL statement, use the Drag&Drop function to move the desired data source, to which the SQL Statement is to be applied, to the target area in the dialog box.
You can choose to add individual columns or entire tables. SimAssist now creates a default SQL Statement in line with the template:
SELECT * FROM yourTable/yourColumn
You can then formulate this statement in accordance with the relevant SQL rules, and therefore generate your own personal SQL Statement.
|
Information As of SimAssist version 9.1, SQL queries can also be created using Drag&Drop. To do this, simply drag any column with the mouse to the desired position in the query. The desired column(s) are inserted at the current cursor position. This is also possible with existing SQL statements, i.e. the existing statement is not overwritten. |
|
Information To read more about SQL syntax, please see the w3schools website, for example. Here you will find in-depth tutorials on using SQL. |
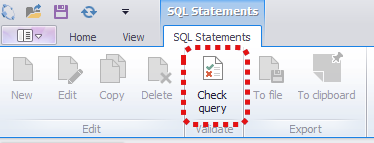
Before saving your SQL statement, we recommend that you check that it is correct. To do so, choose the Validate button in the menu.
SimAssist now checks that the SQL Statement is correct and, if so, displays a corresponding message (see Figure 3).
|
Information Note that column names containing a blank space or other special characters must be enclosed with square brackets ( [...] ) or quotation marks ( "..." ). |
Figure 3.1 - Correct SQL Statement |
Figure 3.2 - Correct SQL Statement |

3.1 Multiple data sources from different data bases
Since SimAssist version 8, it is possible to use multiple data sources for an SQL statement. These can come from different databases, SQL statements or tables.
The result of a query is a result table. When processing multiple data sources in a query, data from multiple tables is merged into a result table.
The tables used as sources can be tables or views from different databases as well as the result tables from other SQL statements.
A query is executed by the respective database driver. As this cannot usually access multiple databases, the merge must be carried out in the application.
The following is necessary for this:
1.Each table used (regardless of the database) is defined in the query (designation: unique name, source: database + element or SQL statement)
2.Copy all data of the defined tables into a temporary SQLite database (all raw data, because conditions can only be executed in the next step)
3.Execute the query in the temporary SQLite database
The Extended mode can be activated via a check box (see Figure 4).
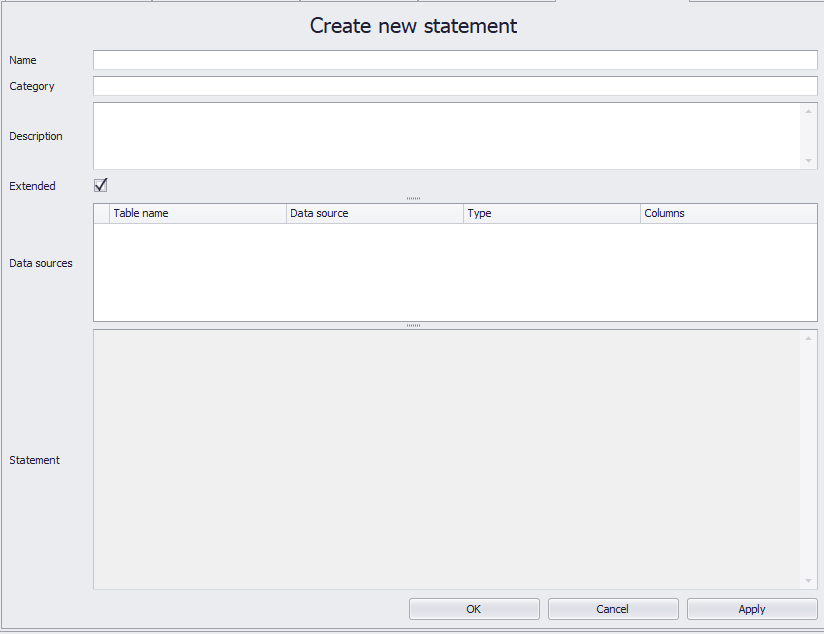
Figure 4 - Extended mode active
In this mode, the Data source field is replaced by a Data sources table control in which source tables can be added, deleted and edited.
If this mode is deactivated, the behavior and view remain as before. The use of SQL queries as data sources, like the use of multiple data sources, is only possible in Extended mode.
A unique name must be assigned in the Table name column in the Data sources area. A data source is connected by dragging it from the SimAssist data area into the data source area in the lower section.
The following data source types can be connected in this way:
•Database tables and views
•SimAssist SQL statements
•Tables from SimAssist data provider interface
•Columns from the content area
In the SQL expression, the tables can be referenced via the user-assigned table name. Adjusting the table name does not result in automatic adjustment in the SQL expression.
The content of the Type column results from the linked data source.
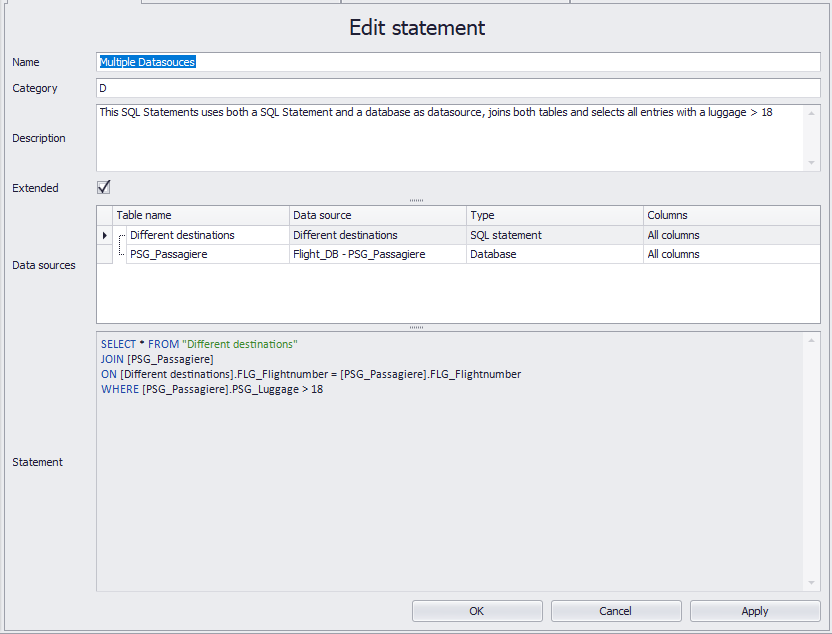
Figure 5 - Extended SQL Statement
|
Attention By using SQL statements and data providers as a source, it is possible to define circular references (statement 1 is dependent on statement 2 and statement 2 is dependent on statement 1). Such SQL statements cannot be executed. A circular reference is communicated to the user by an error message and must be resolved by the user. |
3.2 Data source specific syntax
The following table shows an overview of different SQL statements in the respective data source specific syntax:
SQL Statement |
Oracle |
Access |
SQLite |
DATETIME DATE TIME |
DATE 'YYYY-MM-DD' TIMESTAMP 'YYYY-MM-DD HH24:MI:SS.FF' TIMESTAMP WITH TIME ZONE TIMESTAMP WITH LOCAL TIME ZONE |
Date() "m/dd/yyyy" Time() "h:mm:ss" |
date(timestring,modifier,modifier,...) "YYYY-MM-DD" time(timestring,modifier modifier,...) "HH:MM:SS" date time(timestring,modifier,modifier,...) "YYYY-MM-DDTHH:MM:SS" julianday(timestring,modifier,modifier,...) strftime(format,timestring,modifier,modifier,...) |
IIF |
IIF(search_condition,true_part,false_part) |
IIf([Action]='E','I',IIf([Action]='A','O','R')) |
(CASE WHEN ACTION = 'E' THEN 'I' ELSE (CASE WHEN ACTION = 'A' THEN 'O' ELSE (CASE WHEN ACTION = 'R' THEN 'R' END) END) END) |
DECODE |
decode(expression,compare_value,return_value,[,compare, return_value]...[,default_return_value]) |
--> see SWITCH |
--> see SWITCH |
SUBSTRING |
SUBSTR(input,start-pos[,length]) SUBSTRB(input,start-pos[,length]) SUBSTRC(input,start-pos[,length]) SUBSTR2(input,start-pos[,length]) SUBSTR4(input,start-pos[,length]) |
SUBSTRING(expression,start,length) |
substr(string,start,length) |
MID |
--> see SUBSTRING |
Mid(text,start_position,[number_of_characters]) |
--> see SUBSTRING |
TRIM |
TRIM(string_to_be_trimmed) |
LTRIM(string_to_be_trimmed) RTRIM(string_to_be_trimmed) |
trim(string,[trim_string]) |
SWITCH |
CASE {simple_case_expression|searched_case_expression} [else_clause] END |
Switch(expression1,value1,expression2,value2,...expression_n,value_n) |
CASE case_expression WHEN when_expression_1 THEN result_1 WHEN when_expression_2 THEN result_2 ... [ ELSE result_else ] END |
SQLite has a different handling of data types compared to other databases. This includes that the return value of each aggregate function always has the data type Object.
All aggregate functions are affected by this.
Examples:
•Basic arithmetic operations like add etc.
•Statistical operations like Min/Max/Avg/Sum
•Conversion operations like Cast("value" as TYPE)
If the data in a column has the required format, the SQL query can be extended to return the column with the "correct" data type.
The following example shows how to get the maximum of a Double column back as Double.

|
strftime('%u', date) returns the day of the week starting from monday = 1 strftime('%w', date) returns the day of week 0-6 with Sunday = 0 |

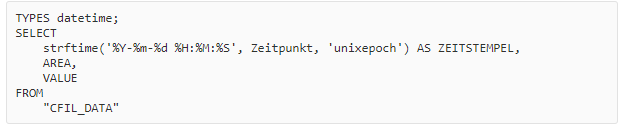
The type conversion in SQLite from Object to the desired data type is done with the following code before the actual query:
TYPES (desired data type separated by ,)

Conversion of a Unix epoch timestamp (number) to a DateTime
The following example is intended to illustrate how the SQL queries created via the plug-in can be used in the context of working with SimAssist.
For this purpose, data specified by a previously created SQL query is to be displayed in a table as an example.
Add the Table plug-in to your project and activate the Queries tab under Data. All SQL queries that you have already created are listed there (see Figure 4).
Via the list of existing queries it is also possible to display queries already used in the project. Details can be found in the chapter Project Data in section 1. Layout of the Project Data Area.
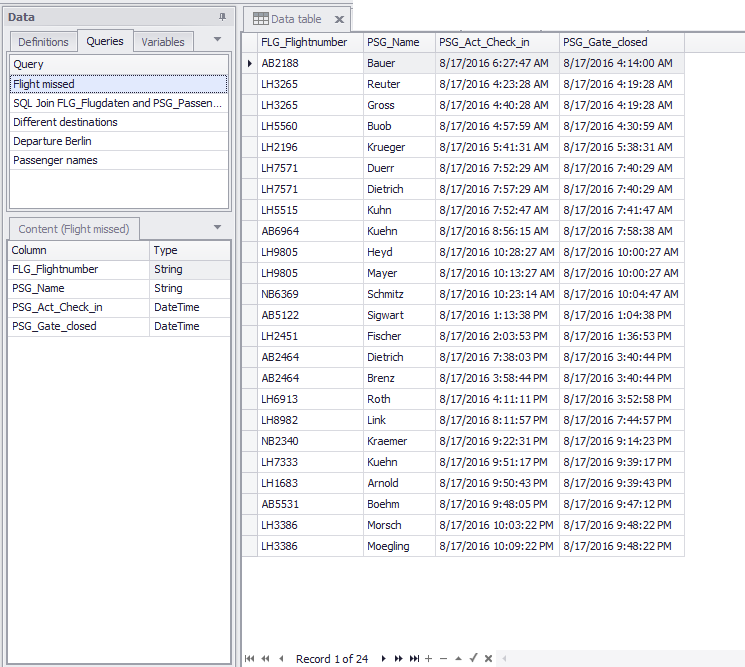
Drag&Drop the desired SQL query into the target area of the Table plug-in. Afterwards, only the data that matches your SQL query will appear in the table (see Figure 5).
Figure 4 - Select queries as data source |
Figure 5 - SQL Statement displayed in a table |

5. How to export SQL Statements
It is easy to export the SQL statements you have created. To do so, select the desired SQL statement in the overview and then choose Export in the plug-in menu.
You then have the choice of exporting to a txt file or saving the statement to the clipboard.
If you choose the latter, your SQL statement will be temporarily stored in the Windows clipboard and you can paste this anywhere you wish via the context menu or using the shortcut CTRL + V.
If, however, you want to create a txt file, please choose As File – the Windows save dialog box then opens, in which you can select the path for the file and then choose Save to confirm your selection.
In the path selected, you will now see a txt file, which contains your SQL Statement.
|
You can also select several SQL statements at once and export these together. This works both for exports to the clipboard and exports to a txt file. |
You can choose Options in the main SimAssist menu to make plug-in-specific settings. The following change options are available for the SQL Statements plug-in:
Option |
Description |
Font size |
|
SQL Statement font size |
Font size inside the SQL statement editor (in pt.) |
Variables |
|
Variables color |
Defines the color used in the SQL Statement Editor to highlight the variables. |
As already mentioned a number of times, SQL statements are an efficient means of customizing data queries.
This advantage is particularly demonstrated by the fact that SQL statements can be used to generate new columns with additional information within data queries – a clear benefit for the user.
The following example aims to explain this in more detail.
Step 1
Figure 6 shows a table which represents a highly simplified record that contains information about status point reports.
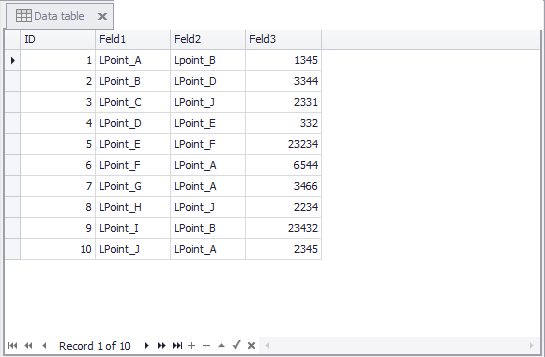
Figure 6 - Status point reports
Step 2
The data in the table indicates several reporting points, as well as the number of objects registered between the relevant reporting points during the course of a day.
It would, however, also be extremely interesting to know the number of objects not just during the course of a day, but also during the course of an hour.
SQL statements, which can be created using the plug-in of the same name, are great for generating this additional information.
In addition to the table that can be seen in Figure 6, the following SQL Statement generates a column containing the desired additional information regarding the hourly reports (see Figure 7).
Specifically, a new column is created via the SQL statement AS, which divides the number of status point reports over the course of an entire day by 24 to calculate an hourly figure.
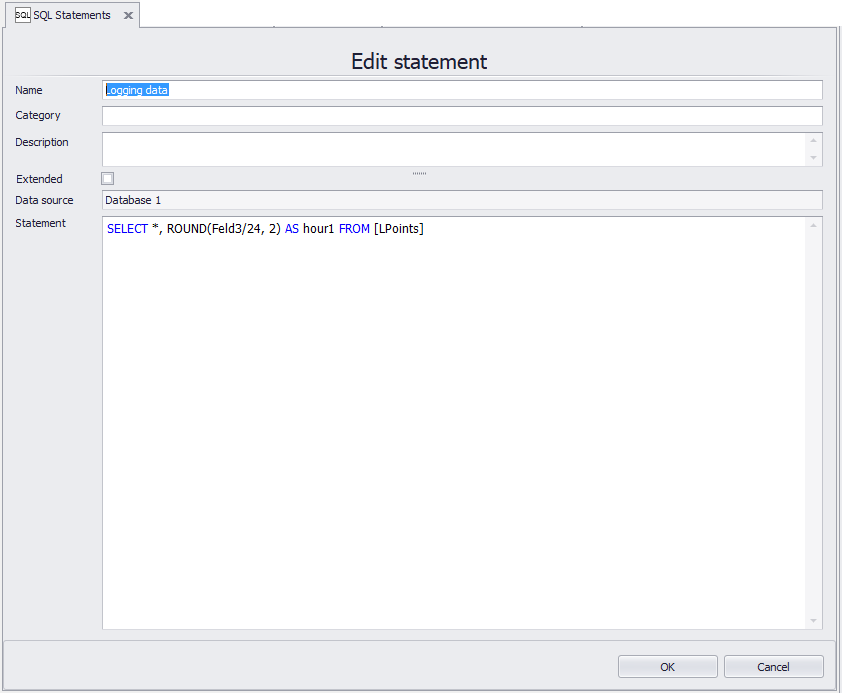
Figure 7 - SQL Statement
Step 3
If this SQL statement is then used in a Table plug-in, the column added using the SQL statement appears and the SimAssist user can access this additional information, and thereby work more efficiently (see Figure 8).
In this way, extensive and highly specific data queries can be generated and used in the individual plug-ins.
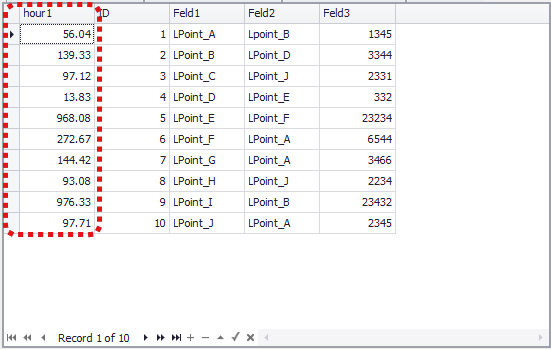
Figure 8 - New column in the table
© SimPlan AG - Hanau District Court, Commercial Register (Part B) 6845 - info@simplan.de - www.simplan.de/en