The main purpose of the project content area, which forms part of the project window, is to manage and organize the content of a given project. All plug-ins assigned to the project are managed here.
Contents
2. How to manage and organize plug-ins
3. How to Position the Project Content Area (Docking)
To add plug-ins to the project content area from the Plug-in Library, right-click the desired plug-in in the plug-in library and choose Add to Project from the context menu.
Alternatively, you can also simply move the plug-in from the library to the project content area using Drag&Drop.
2. How to manage and organize plug-Ins
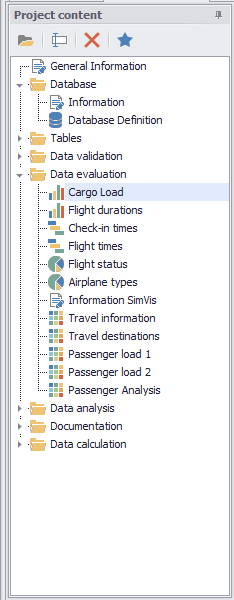
By default, the project content area is docked next to the project data area in the project window and can be accessed from the Project Content tab at the bottom of the project window (see Figure 1).
The project content area has a menu that provides quick and easy access to the main interaction options:
Figure 1 - Project Content |
To maintain the best possible overview of the plug-ins you are using, you can organize plug-ins into folders, and thereby group them. You can do this by either choosing the relevant button in the menu bar or by right-clicking in the project content area to open the context menu and then choosing the option New Node. You can then use the Drag&Drop function to move plug-ins or other folders to the folder you have just created. Um You can also use the Drag&Drop function to move your folders and plug-ins as desired, and thereby sort the project content area. You can rename plug-ins and folders either by choosing the relevant button in the project content area menu or via the context menu for the plug-in selected. You can also delete a plug-in or folder via either the project content area menu or the relevant context menu.
Copy plug-ins in the same project: With the help of the pressed CTRL key in combination with a Drag&Drop process an exact copy of a plug-in instance with all settings can be made.
Copy plug-ins to another project Created plug-in instances can also be copied from one project to another using the Drag&Drop functionality. To do this, only the relevant projects need to be arranged next to each other (or below or above each other) via the docking functionality in SimAssist. Then the desired instance can be copied by Drag&Drop. |
Copying plug-ins in the same project
Using the CTRL key in combination with a Drag&Drop operation, an exact copy of a plug-in instance with all its settings can be made.
Alternatively, you can copy the plug-in using the “Duplicate” option in the context menu.
Copying plug-ins to another project
Created plug-in instances can also be copied from one project to another using the Drag&Drop functionality.
To do this, simply arrange the relevant projects next to each other (or below or above each other) using the docking functionality in SimAssist.
Then the desired instance can be copied via Drag&Drop.
3. How to Position the Project Content Area (Docking)
Figure 2 - Docking |
You can position the project content area at various places in the frame application. To find out how to move the relevant window, please see Docking section. First, you can position the project content area anywhere in the project window, as well as over the entire area (see Figure 2). You can also dock the project content area anywhere in the project window (see highlighting in Figure 3). You can, of course, also use the project content area fully decoupled from all other windows. |

© SimPlan AG - Hanau District Court, Commercial Register (Part B) 6845 - info@simplan.de - www.simplan.de/en