The following comprises instructions for the plug-in Checking.
Contents
1. Introduction to the plug-In
1.3 Position in the Overall Software Package
1. Introduction to the plug-in
The Checking function enables you to accurately check any data pool and its values.
Using regular statements, you can specify exactly which value ranges you want to measure, for which ranges a warning is to be displayed and for which an error message.
This enables you to see at a glance which values do not lie within the tolerance, and thereby identify rogue results, for example.
The Checking plug-in enables you to create as many rules as desired, which, on the basis of regular statements, evaluate the data pool to be checked and show precisely which values lie within the tolerance predefined by you, which generate a warning and which are interpreted as errors.
In a detailed view, you can filter and sort the value results to enable you to maintain an overview of the evaluation of your data at all times.
1.3. Position in the Overall Software Package
The Checking plug-in is part of the 2check module, which also contains the SQL Statements and Variables plug-ins. Checking is available when you license the 2check module for SimAssist.
1.3.2. Links to Other plug-ins
The Checking plug-in is linked to all other plug-ins that can be involved in the process of data querying. These plug-ins are Database definition, Variables and SQL Statements.
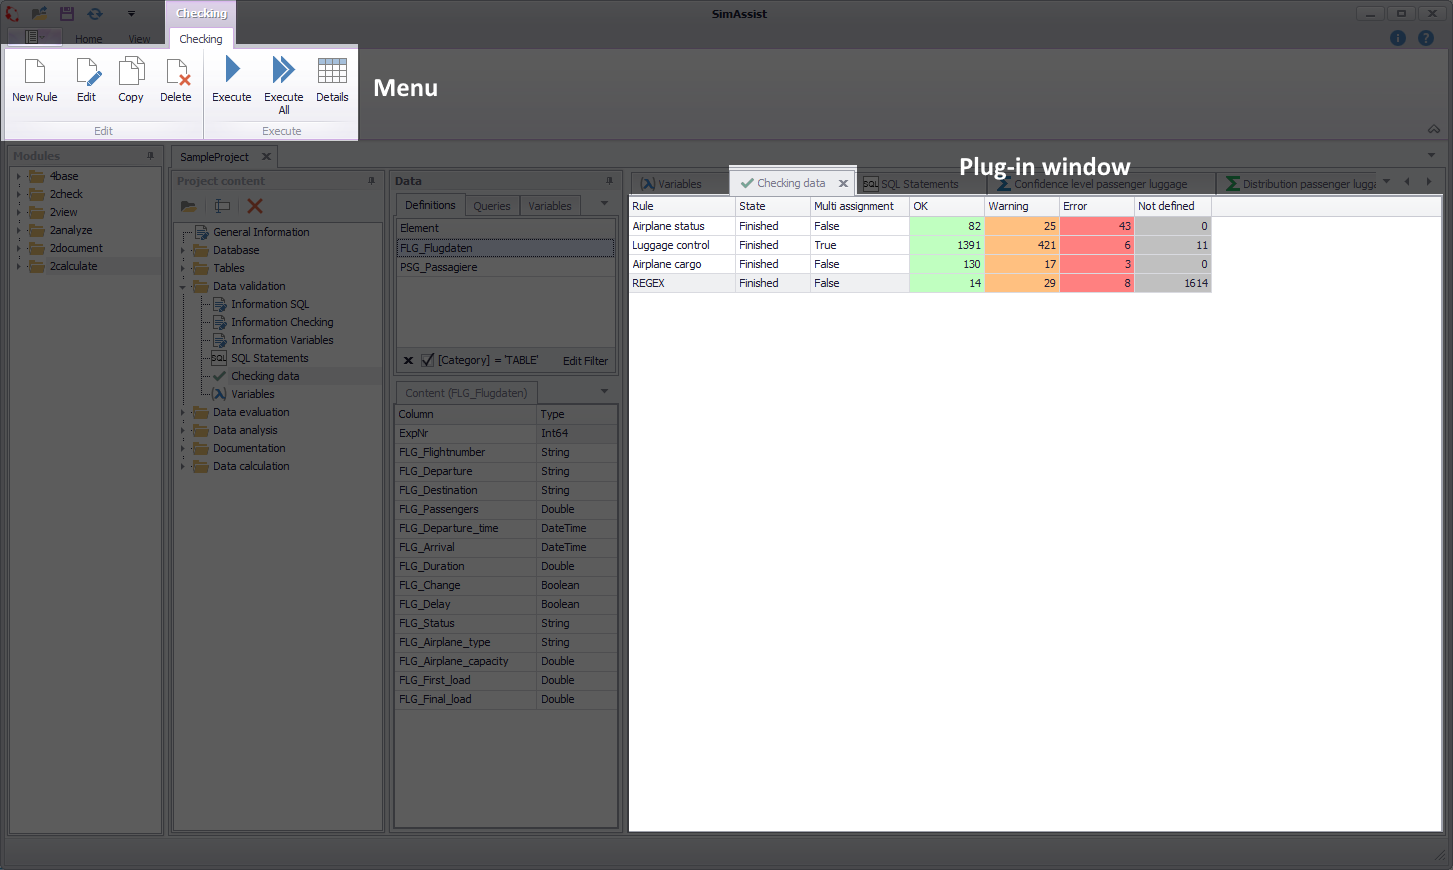
Figure 1 - Layout of the Checking plug-in
At the top of the Checking plug-in, you can see the menu, which contains all the interaction options for checking records. Any rules already created are displayed below this.
The Checking plug-in menu contains the functions required to create and manage rules for checking data.
You can also view detailed information about the evaluations after application of a rule. The list below presents all the menu’s interaction areas and describes their function.
Button |
Description |
|
Opens the dialog box for creating a new rule. |
|
Opens the dialog box for editing the rule currently selected. |
|
Copies the rule(s) currently selected and saves the copy. |
|
Deletes the rule(s) currently selected. |
|
Executes the rule currently selected. |
|
Uses all rules created for the relevant data. |
|
Opens the detailed view for the rule currently selected, which shows more detailed information about each individual data pool value. |


By checking the Multi assignment check box when creating new rules, it is possible to assign each value to all categories whose conditions the value fulfills.
If the check box Multi assignment is set (default setting), all defined conditions will be checked when checking a value and the value will be assigned to all categories whose conditions it fulfills.
This can cause the total sum of all assigned values to differ from the number of checked values, e.g. if a value is assigned to more than one category and is thus counted multiple times.
The special category Not defined, which has no condition of its own, will continue to be used as before.
I.e. if a value could not be assigned to any other category, then the value will be assigned to the category Not defined.
By assigning several categories to one value, the color for the detail table is no longer clearly defined.
For this reason, values that are assigned to multiple categories are displayed in a gray default color that cannot be changed by the user.
In the detail table, the user can no longer recognize to which categories these values are assigned on the basis of the display type of values that are assigned to several categories.
He can only recognize that these values are assigned to more than one category by means of the separate display type.
The filter buttons in the detail table take into account values that are assigned to more than one category.
I.e. if a value is assigned to more than one category, and the filter is set only to one or a subset of the assigned categories, then the row with the value will be displayed.
Example:
•OK: > 10
•Warning: > 100
•All values >100 are assigned to both categories. The filter in the detail table is set to Warning.
All rows with value >100 are displayed, although these values also belong to the OK category and this category is hidden.
Step 1
To create a new rule, choose New Rule in the plug-in menu. The dialog box for adding new rules appears (see Figure 2).
Then you have to give a name for the rule to be created in the Name field. Please note that the name must be unique within the project.
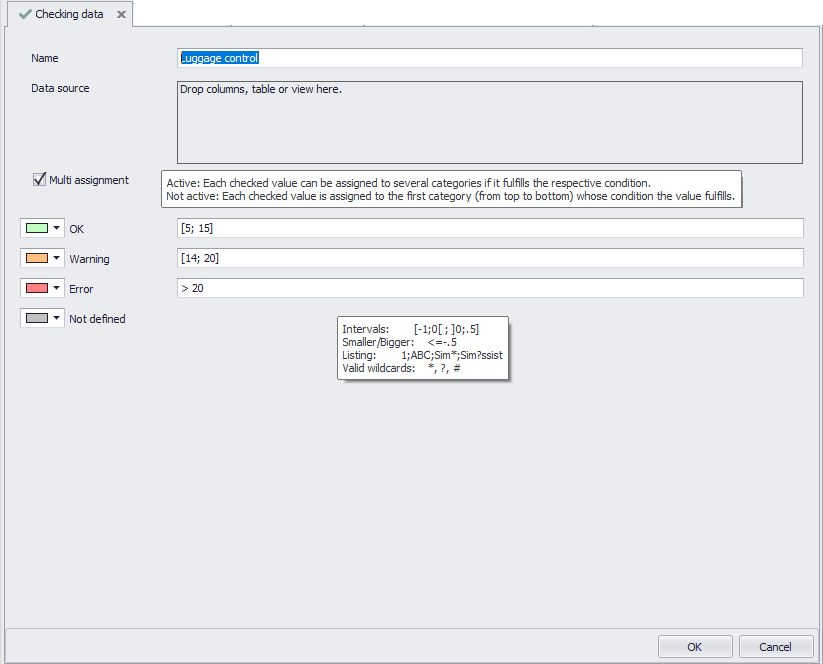
Figure 2 - Dialog box for adding new rules
Step 2
Use the Drag&Drop function to move the data source to which the rule is to be applied to the Data Source area in the dialog box (see figure 3).
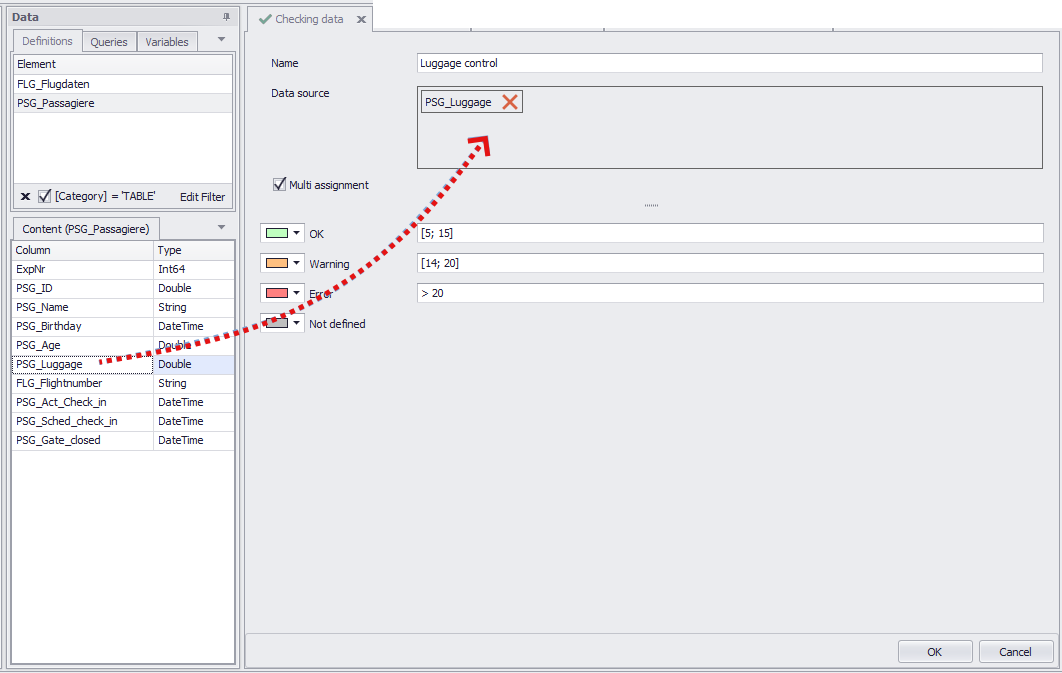
Figure 3 - Adding data
You can then enter your individual rules in the OK, Warning and Error fields. A pop-up, which informs you which statements are possible here, appears when you move the cursor over one of the input fields.
The following table provides examples and explanations for the individual rules.
Name |
Definition |
Example |
Result |
Intervals |
With intervals, an area can be defined: [ includes the value ] excludes the value ; separates single intervals . as separator (.9 = 0,9) |
[1;5] ]1;5] [0;.5] ; [.6;1[ |
All values between 1 and 5, including 1 and 5 All values between 1 and 5, excluding 1 and including 5 Values between 0 and 0,5, including 0 and 0,5 and values between 0,6 and 1, including 0,6 and excluding 1 |
Bigger/smaller |
> bigger, < smaller, = equal |
> 5 <= 5 |
Values greater than 5 Values less than or equal to 5 |
Listing |
Listings a separated by ; 1;2;3;abc;ABC |
|
|
Wildcards |
Wildcards are placeholders: * random count of characters ? random character # random number |
Sim* Sim?ssist station_# |
all values/strings that begin with Sim SimAssist, but also SimBssist, SimCssist etc. station_1, station_2,..., station_100 etc. |
Step 3
In addition, you can also define a different color value for each of the four categories (OK, Warning, Error and Not Defined). To do so, click the color field in front of the relevant category and select the desired color.
Once you have made all your entries, you can choose OK to save the new rule. The new rule is now displayed in the plug-in overview, together with the evaluation (see Figure 1).
As shown in Figure 1, you can see an initial rough evaluation of the rule in the overview. The number of values per category (OK, Warning, Error and Not Defined) are displayed here.
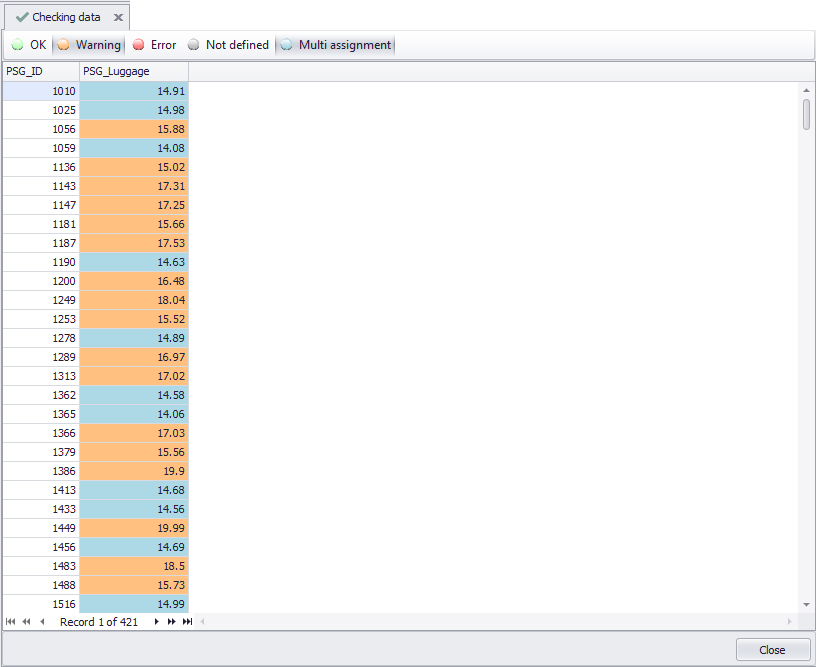
To view a more detailed evaluation, select the desired rule and choose Details – a detailed view of the relevant rule appears (see Figure 4).
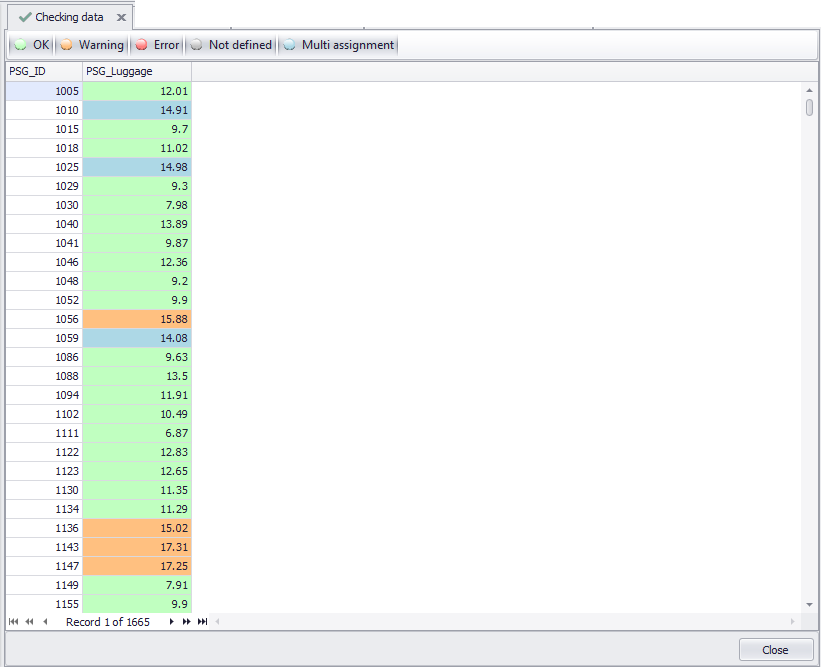
Figure 4 - Detail view
In a tabular overview you can see all values that are contained in your data source. Depending on the category to which they belong (including multi assignments), the values are highlighted in color.
For example, in the default color setting, values that have been assigned to the Error category according to your rule conditions appear in red, values in the Warning category appear in orange, and values in the OK category appear in green.
Those values that do not belong to any of the categories are labeled as Not defined by default and highlighted in gray.
Values that meet the rules of several categories are classified under Multi Assignment.
If the Multi Assignment category is deactivated in the details view, the values will also disappear from the view, even though they belong to the active Warning category (see Figures 5 and 6).
Clicking the Close button closes the detail view and the overview of all rules created so far reappears.
Figure 5 - Category Warning with multi assignment |
Figure 6 - Category Warning without multi assignment |

© SimPlan AG - Hanau District Court, Commercial Register (Part B) 6845 - info@simplan.de - www.simplan.de/en